

edgeMED Help Center > Electronic Health Records > EHR
Use encounter plugins.
Vitals
Information in the Vitals plugin will automatically pull from the most recently added vitals for the patient.

Click Update on the right side of the plugin heading to re-sync the Vitals information and pull from Vitals & Charting into the encounter.
Changes to the information in Vitals & Charting will not affect the previously saved entry. Any changes to the Vitals will be added as a new entry to Vitals & Charting once the encounter has been signed.
Patient History
Medical History
Information in the Medical History plugin will automatically pull from the information in the PFSH section under Medical History.

Click Update on the right side of the plugin heading to re-sync the medical history information and pull from the section into the encounter.
Next, add specific diagnoses using the + symbol next to the medical history heading.
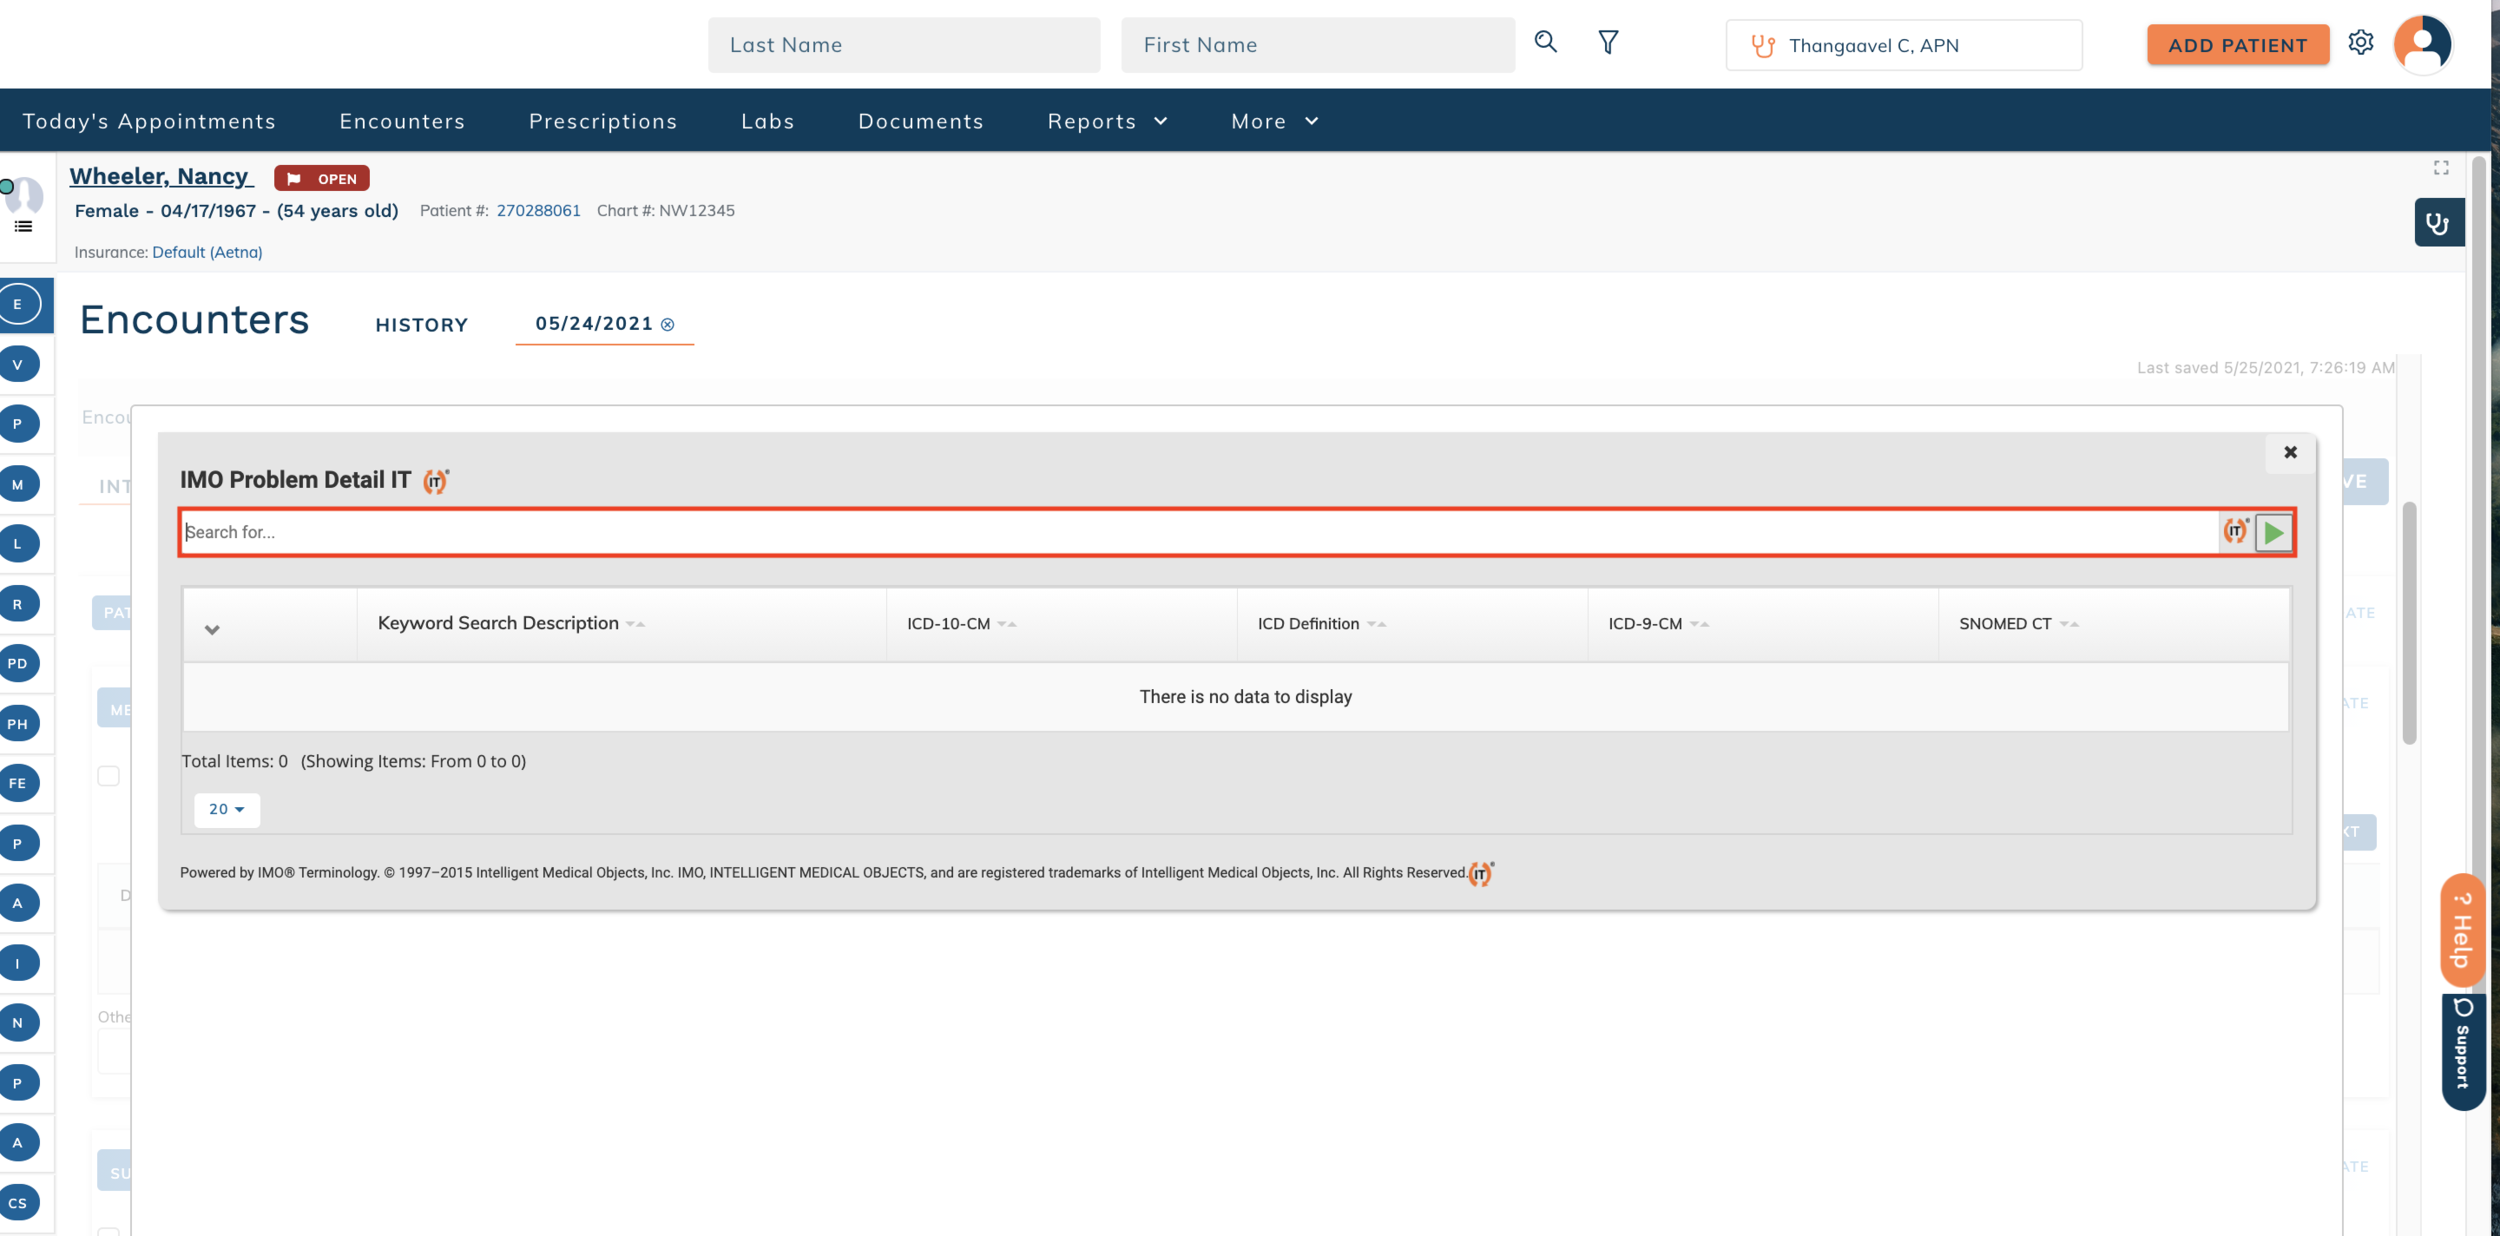
In the IMO pop-up, search by keyword or description to find ICD-10 codes. Once the search results are returned and displayed, click on the + icon to add a diagnosis to the plugin.

Click on the > icon to narrow down additional diagnosis details.

Select options using the checkbox sections.

Choose the appropriate diagnosis using the + icon to add it to the plugin.

Click the blue Free Text button to add medical history without linking it to an ICD-10 code. You can remove medical history using the x icon on the right side of the row.
You may also add additional notes in the Other Info section.
Added and removed medical history will update into the PFSH section once the encounter has been signed.
Hospitalization History
Information in the Hospitalization History plugin will automatically pull from the information in the PFSH section under Hospitalization History.

Click Update on the right side of the plugin heading to re-sync the hospitalization history information and pull from the section into the encounter.

Add specific diagnoses using the + icon next to the heading.
In the IMO pop-up, search by keyword or description to find ICD-10 codes. Once the search results are returned and displayed, click on the + icon to add a diagnosis to the plugin.
Click on the > icon to narrow down additional diagnosis details.
Select options using the checkbox sections. Choose the appropriate diagnosis using the + icon to add it to the plugin.
Click the blue Free Text button to add hospitalization history without linking it to an ICD-10 code. Remove hospitalization history using the x icon on the right side of the row.
You may add additional notes in the Other Info section.
Added and removed hospitalization history will update into the PFSH section once the encounter has been signed.
Surgical History
Information in the Surgical History plugin will automatically pull from the information in the PFSH section under Surgical History.

Click Update on the right side of the plugin heading to re-sync the surgical history information and pull from the section into the encounter.

Add specific diagnoses using the + icon next to the heading.
In the IMO pop-up, search by keyword or description to find ICD-10 codes.
Click on the + icon to add a diagnosis to the plugin. Click on the > icon to narrow down additional diagnosis details.
Select options using the checkbox sections. Choose the appropriate diagnosis using the + icon to add it to the plugin.
Click the blue Free Text button under the surgical history section to add history without linking it to an ICD-10 code. Remove hospitalization history using the x icon on the right side of the row.
You may add additional notes in the Other Info section.
Added and removed surgical history will update into the PFSH section once the encounter has been signed.
Implantable Device History
Information in the Implantable Device History plugin will automatically pull from the information in the PFSH section under Implantable Device History.

Click Update on the right side of the plugin heading to re-sync the implant information and pull from the section into the encounter.

Add devices using the + icon next to the heading. Search the implant device library to add a device. Indicate the appropriate details using the Date, Serial Number, and Status columns. Once an item(s) is selected, you can also remove devices using the x icon on the right side of the row.
Added and removed implantable devices will update into the PFSH section once the encounter has been signed.
Allergy History
Information in the Allergy History plugin will automatically pull from the information in the PFSH section under Allergy History.

Click Update on the right side of the plugin heading to re-sync the allergy information and pull from the section into the encounter.

Add allergies using the + icon next to the heading. Search the food and drug allergy library to add a device. Indicate the appropriate details using the Reaction, Comments, and other columns.
Once an item(s) is selected, you can also remove devices using the x icon on the right side of the row.
Added and removed allergy history will update into the PFSH section once the encounter has been signed.
Medication History
Information in the Medication History plugin will automatically pull from the information in the PFSH section under Medication History.
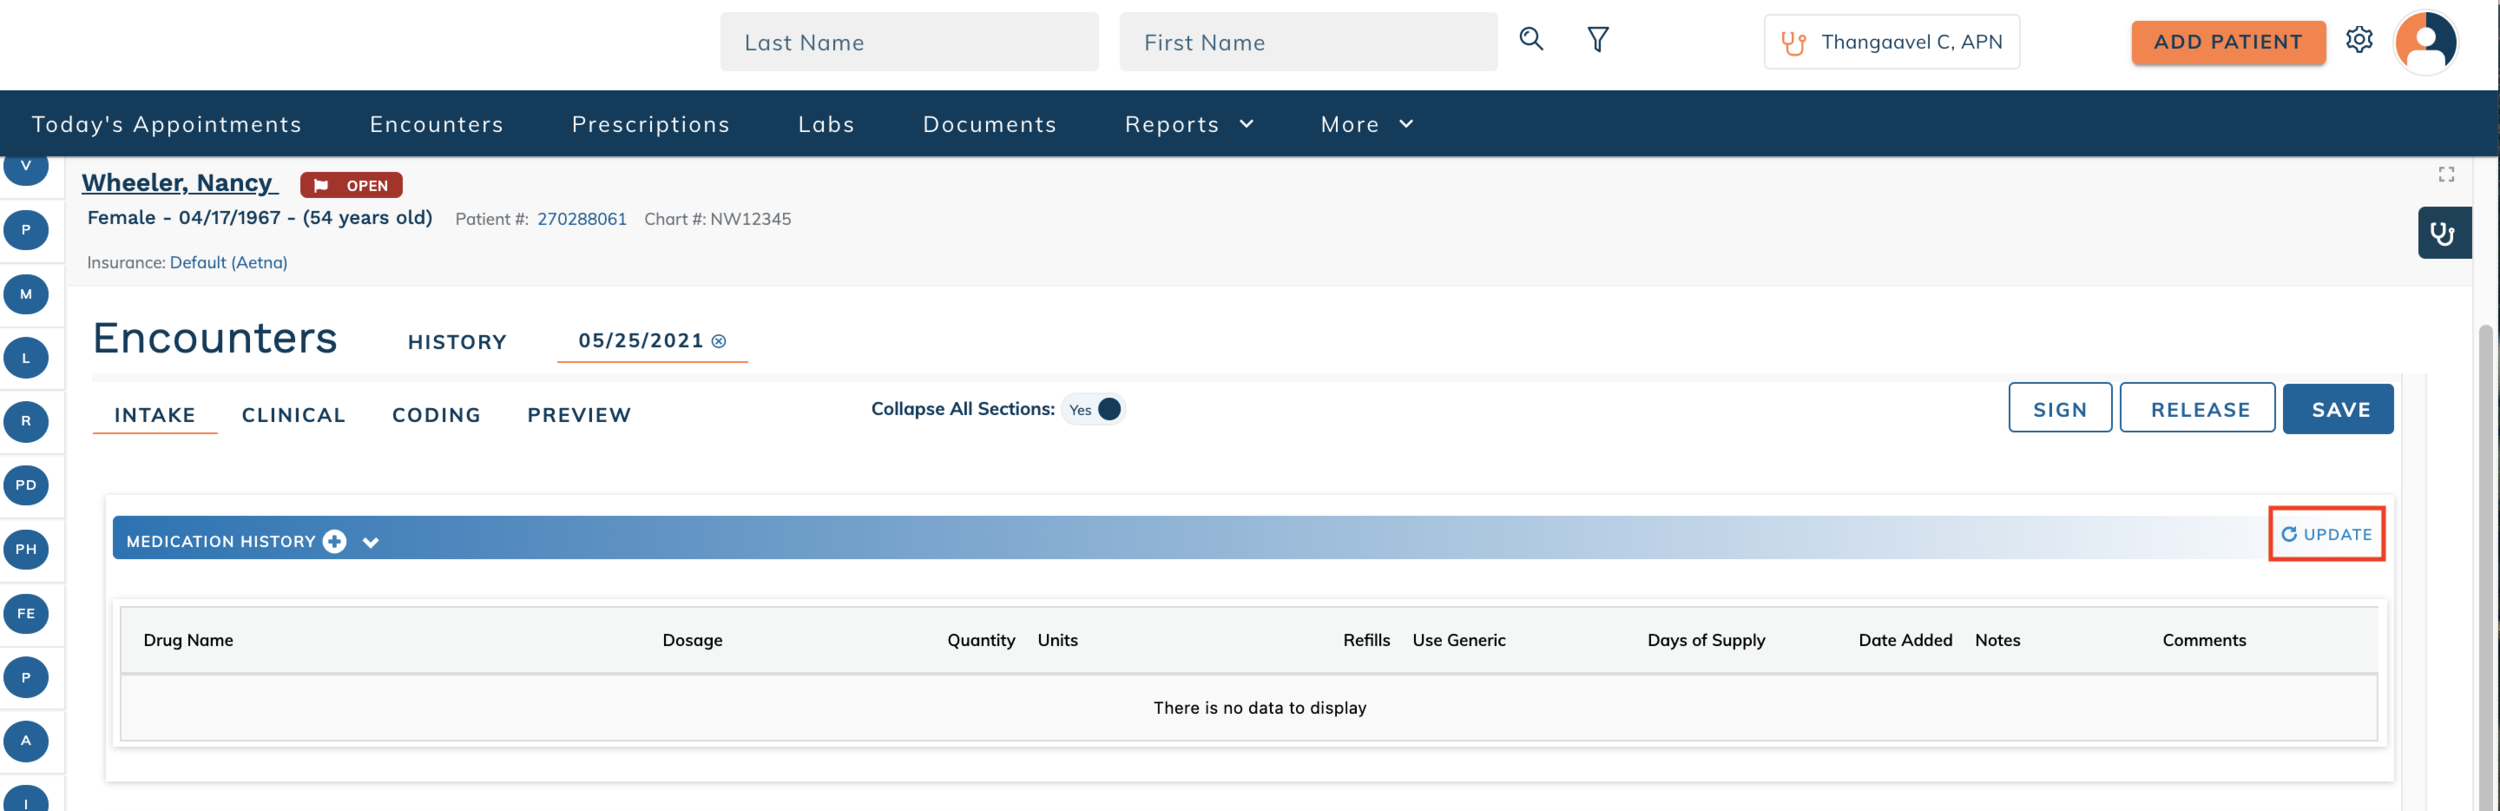
Click Update on the right side of the plugin heading to re-sync the medication information and pull from the section into the encounter.

Add medications using the + icon next to the heading. Search the drug library to add a medication. Indicate the appropriate details using the Dosage, Quantity, Units, Refills, Use Generic, Days Supply, Date, and Comments columns.
Once an item(s) is selected, you can also remove devices using the x icon on the right side of the row.
Added and removed medication history will update into the PFSH section once the encounter has been signed.
Family History
Information in the Family History plugin will automatically pull from the information in the PFSH section under Family History.

Click Update on the right side of the plugin heading to re-sync the family history information and pull from the section into the encounter.

Add specific diagnoses using the + icon next to the heading.
In the IMO pop-up, search by keyword or description to find ICD-10 codes.
Click on the + icon to add a diagnosis to the plugin. Click on the > icon to narrow down additional diagnosis details.
Select options using the checkbox sections. Next, you will choose the appropriate diagnosis using the + icon to add it to the plugin.

Indicate the associated family member using the dropdown selection.

Click Free Text to add family history without linking it to an ICD-10 code.
Once an item(s) is selected, you can also remove devices using the x icon on the right side of the row.
Added and removed family history will update into the PFSH section once the encounter has been signed.
Social History
Information in the Social History plugin will automatically pull from the information in the PFSH section under Social History.

Click Update on the right side of the plugin heading to re-sync the social history information and pull from the section into the encounter.

Add smoking status using the + icon next to the heading. Indicate the status using the dropdown selection and adjust the date columns as appropriate.
You may also remove smoking status using the x icon on the right side of the row.
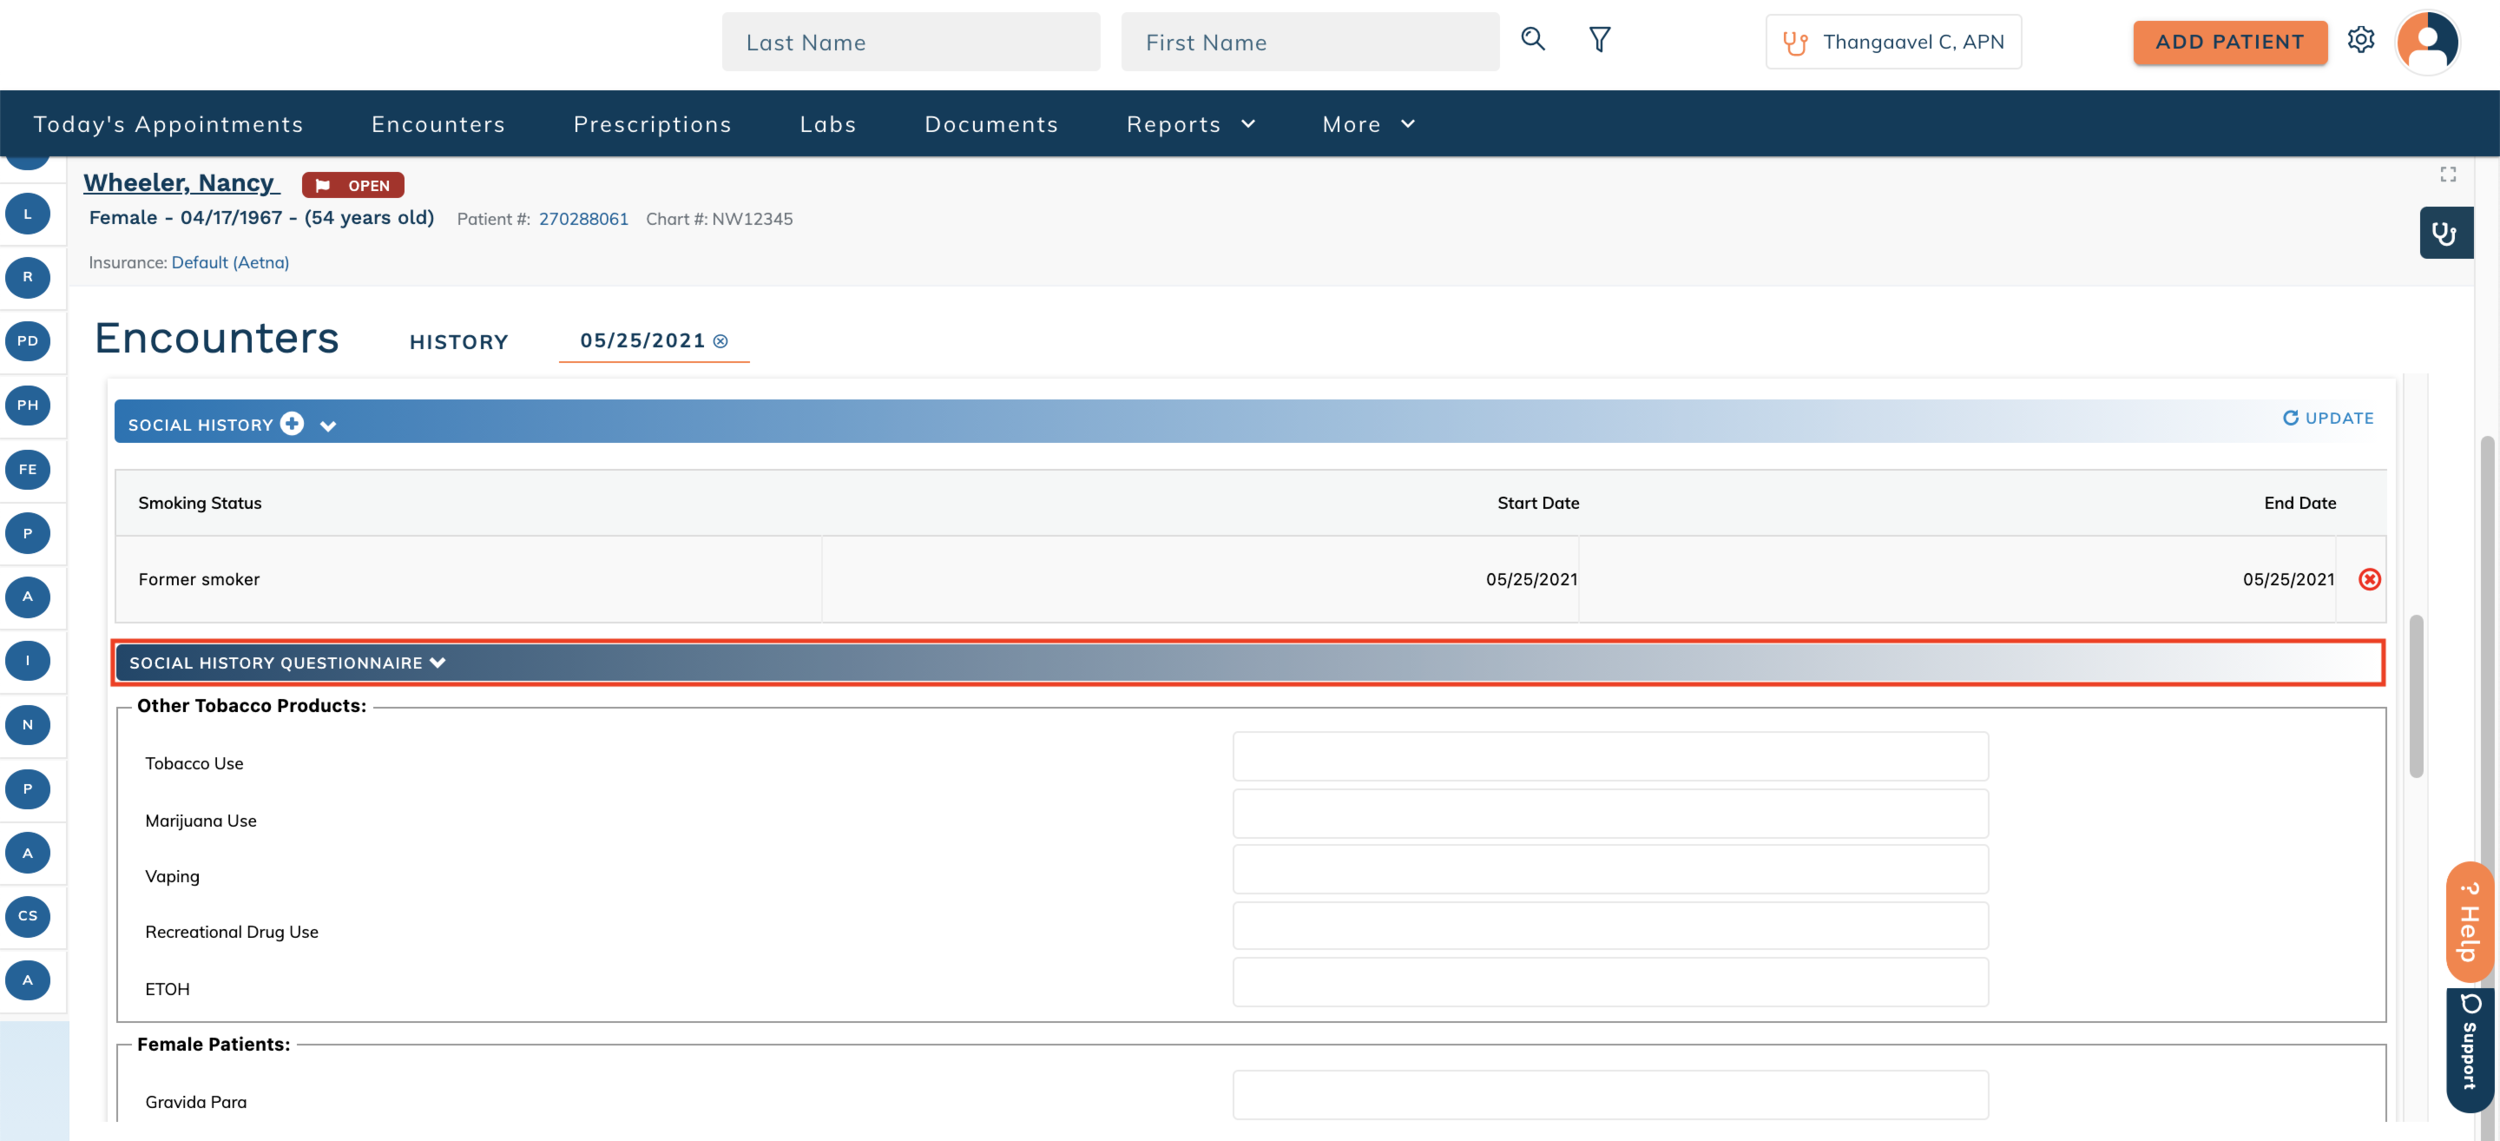
Click the heading for Social History Questionnaire to view and update the details.
Added, removed, and changed social history will update into the PFSH section once the encounter has been signed.
Current Medications
Information in the Current Medications plugin will automatically pull from the information in the Medications section on the Current tab.
Click Update on the right side of the plugin heading to re-sync the medication information and pull from the section into the encounter.
Add medications using the + icon next to the heading. Search the medication library to add a patient medication. Indicate the appropriate details using the Dosage, Quantity, Units, Refills, Use Generic, and Start Date columns. You may also remove medications using the x icon on the right side of the row.
Added and removed medications will update into the current medication list once the encounter has been signed.
Allergies
Information in the Allergies plugin will automatically pull from the information in the Allergies section.
Click Update on the right side of the plugin heading to re-sync the allergy list and pull from the section into the encounter.
Add allergies using the + icon next to the heading. Search the library of food and drug allergies to add a patient allergy. Add the patient's reaction, the severity, and additional comments and information as needed. You may also remove allergies using the x icon on the right side of the row.
Added and removed allergies will update into the allergy section once the encounter has been signed.
Immunizations
Information in the Immunizations plugin will automatically pull from the information in the Immunization section.

Click Update on the right side of the plugin heading to re-sync the immunization list and pull from the section into the encounter.

Add immunization records using the + icon next to the heading.

Search for the immunization from the vaccine database. Enter additional information as appropriate.

If your practice is set up for immunization registry reporting, you can select Include in Registry to send this immunization record to your state's registry.
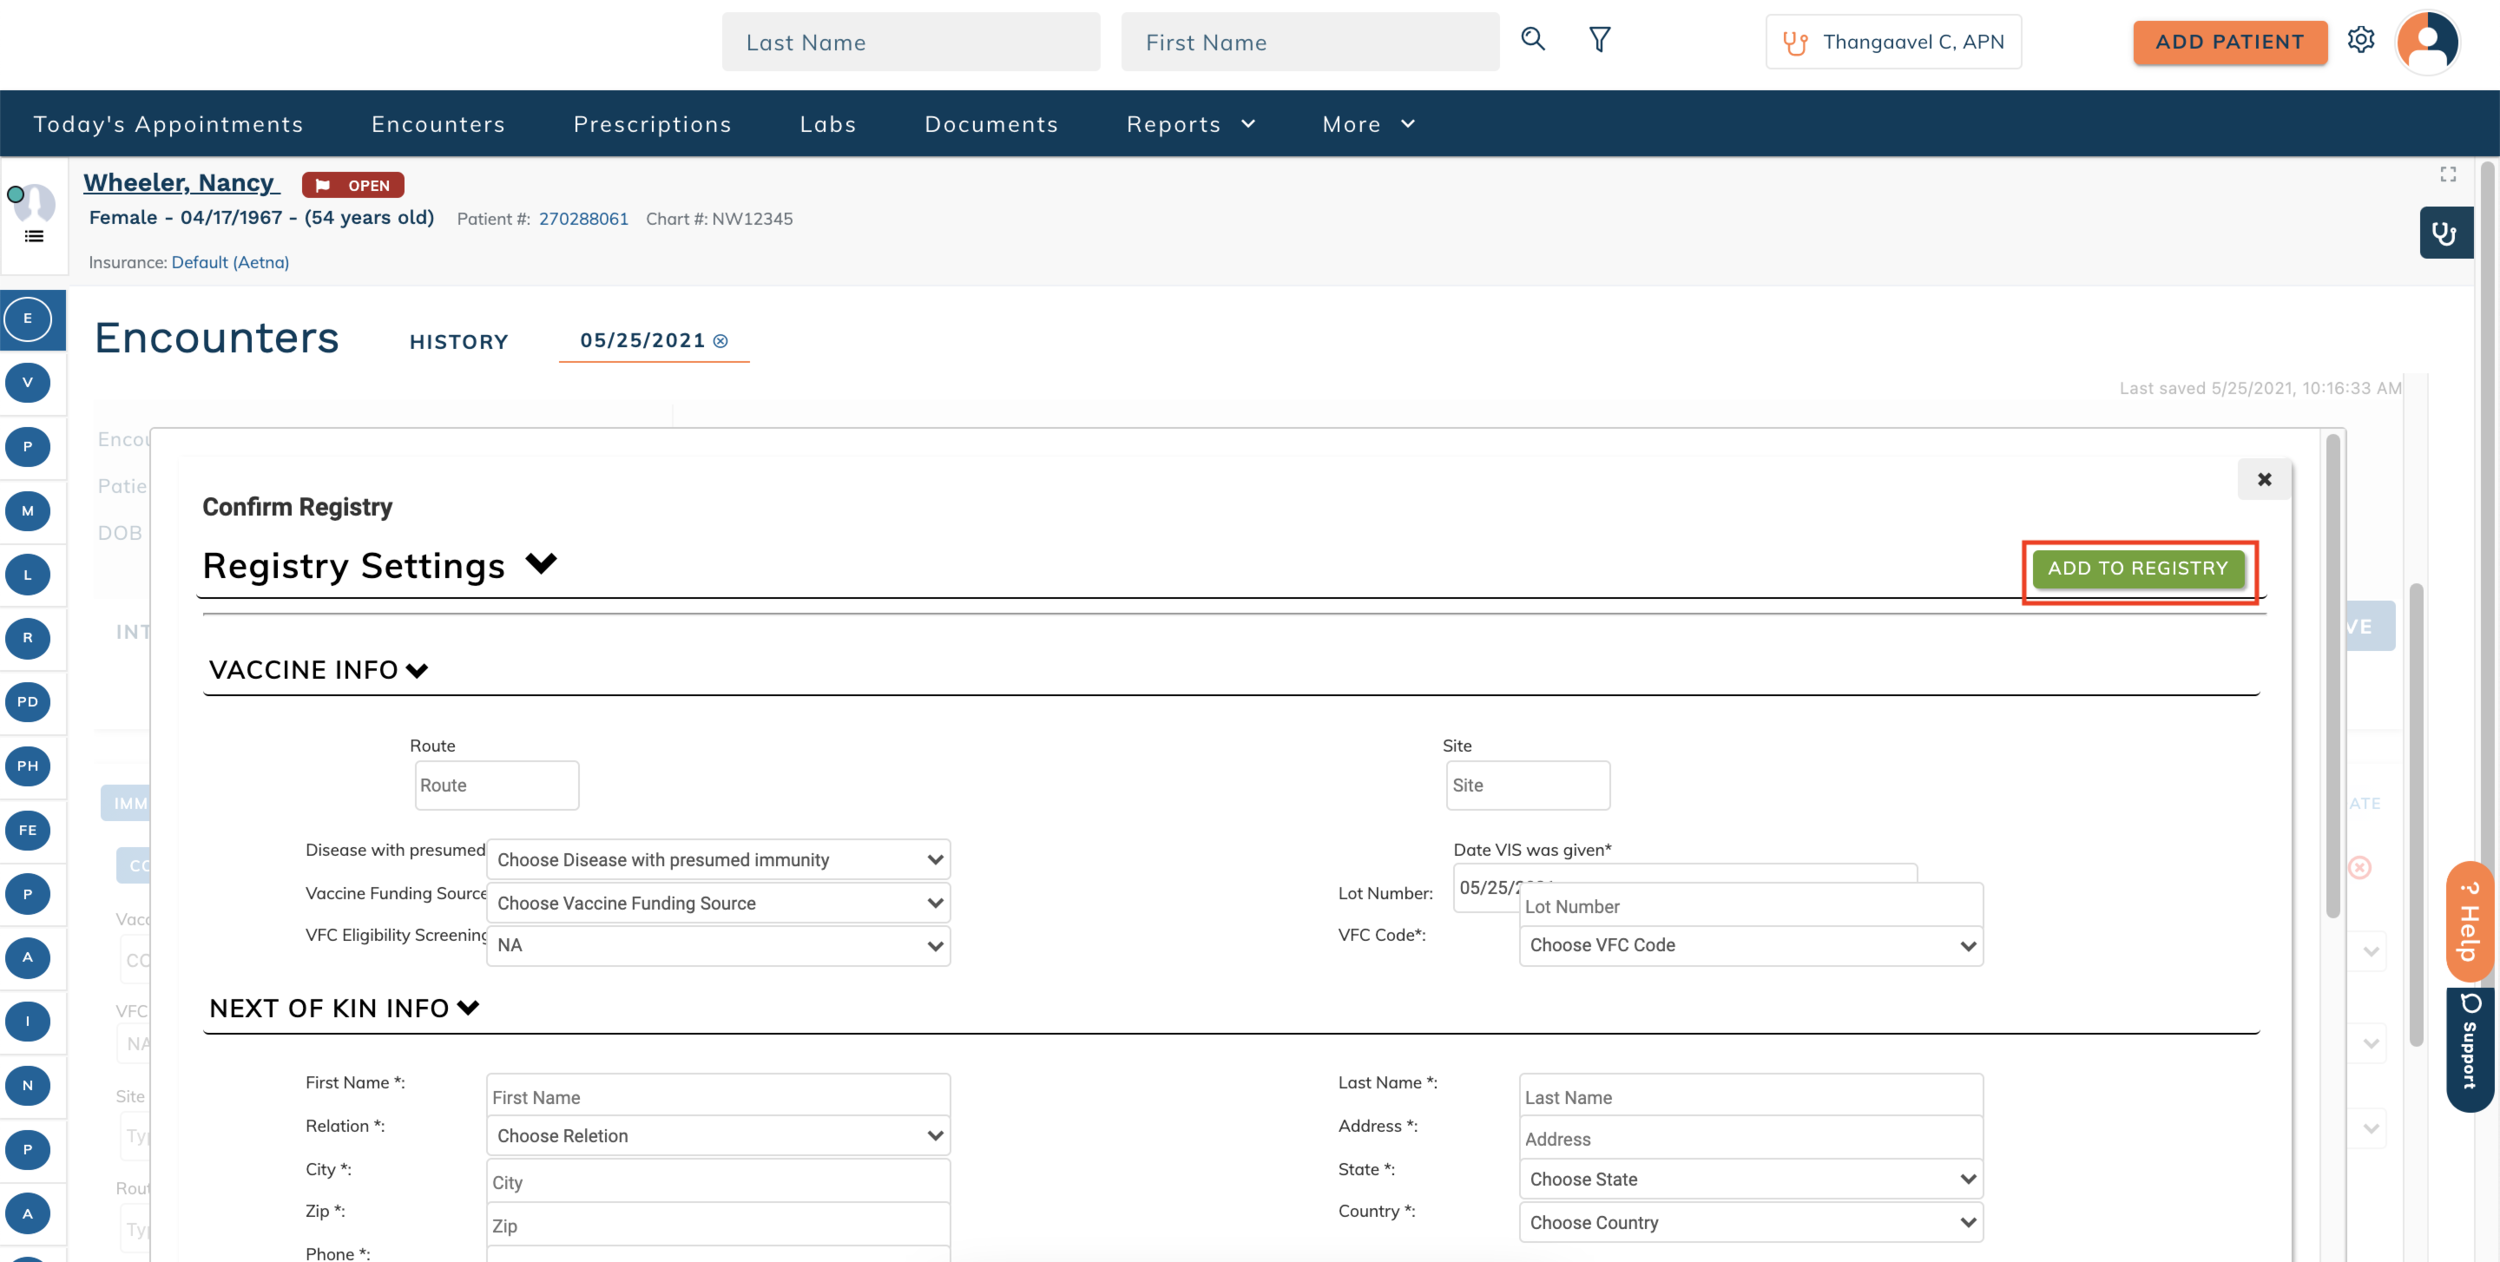
Additional details are required for registry reporting. Complete the additional fields in the pop up and then click Add to Registry. When done, each added immunization record displays in a separate sub-section. Remove immunizations using the x icon on the right side of the sub-section header screen once it displays.
Added and removed immunizations will update into the immunization section once the encounter has been signed.
Billing and Coding
Diagnosis
Information in the Diagnosis plugin will automatically pull from the information in the Problems section.

Click Update on the right side of the plugin heading to re-sync the diagnosis information and pull from the section into the encounter.

Add new diagnoses using the + icon next to the heading.
In the IMO pop-up, search by keyword or description to find ICD-10 codes.
Click on the + icon to add a diagnosis to the plugin. Click on the > icon to narrow down additional diagnosis details.
Select options using the checkbox sections.
Choose the appropriate diagnosis using the + icon to add it to the plugin.

Click the three-dot icon and select Delete to remove a diagnosis.
Added and removed diagnoses will update into the Problem section once the encounter has been signed.
Procedures
No information will be populated into the Procedures plugin by default since the CPT details are specific to the individual patient encounter.

Use the Procedure Macro dropdown to populate groups of codes in the plugin.

Select the appropriate macro from the list to add the diagnosis and procedures that were set up in the practice management component.

Use the procedure search bar to add a single procedure code to the plugin.

Select from one of the five procedures you've used most recently. You can type all or part of a CPT code in the search bar, or keywords to search by description, then use the 'Enter' key to search. Select the appropriate procedure.

The Add New Code pop up will automatically launch with the selected procedure.
Use the Diagnosis option to link a patient diagnosis to the procedure. Diagnosis codes are available from those added in the Diagnosis plugin. You may use the Modifier option to link modifiers to the procedure. Modifiers are available from the full list of procedure modifiers.
Click the + icon to link up to four diagnosis codes and modifiers to the procedure. Once you have added information, a Trash can icon will appear next to the item. Click the Trash icon to unlink a diagnosis code or modifier.
Add Units for the procedure.
Click Add Advanced Information to add additional line item details.
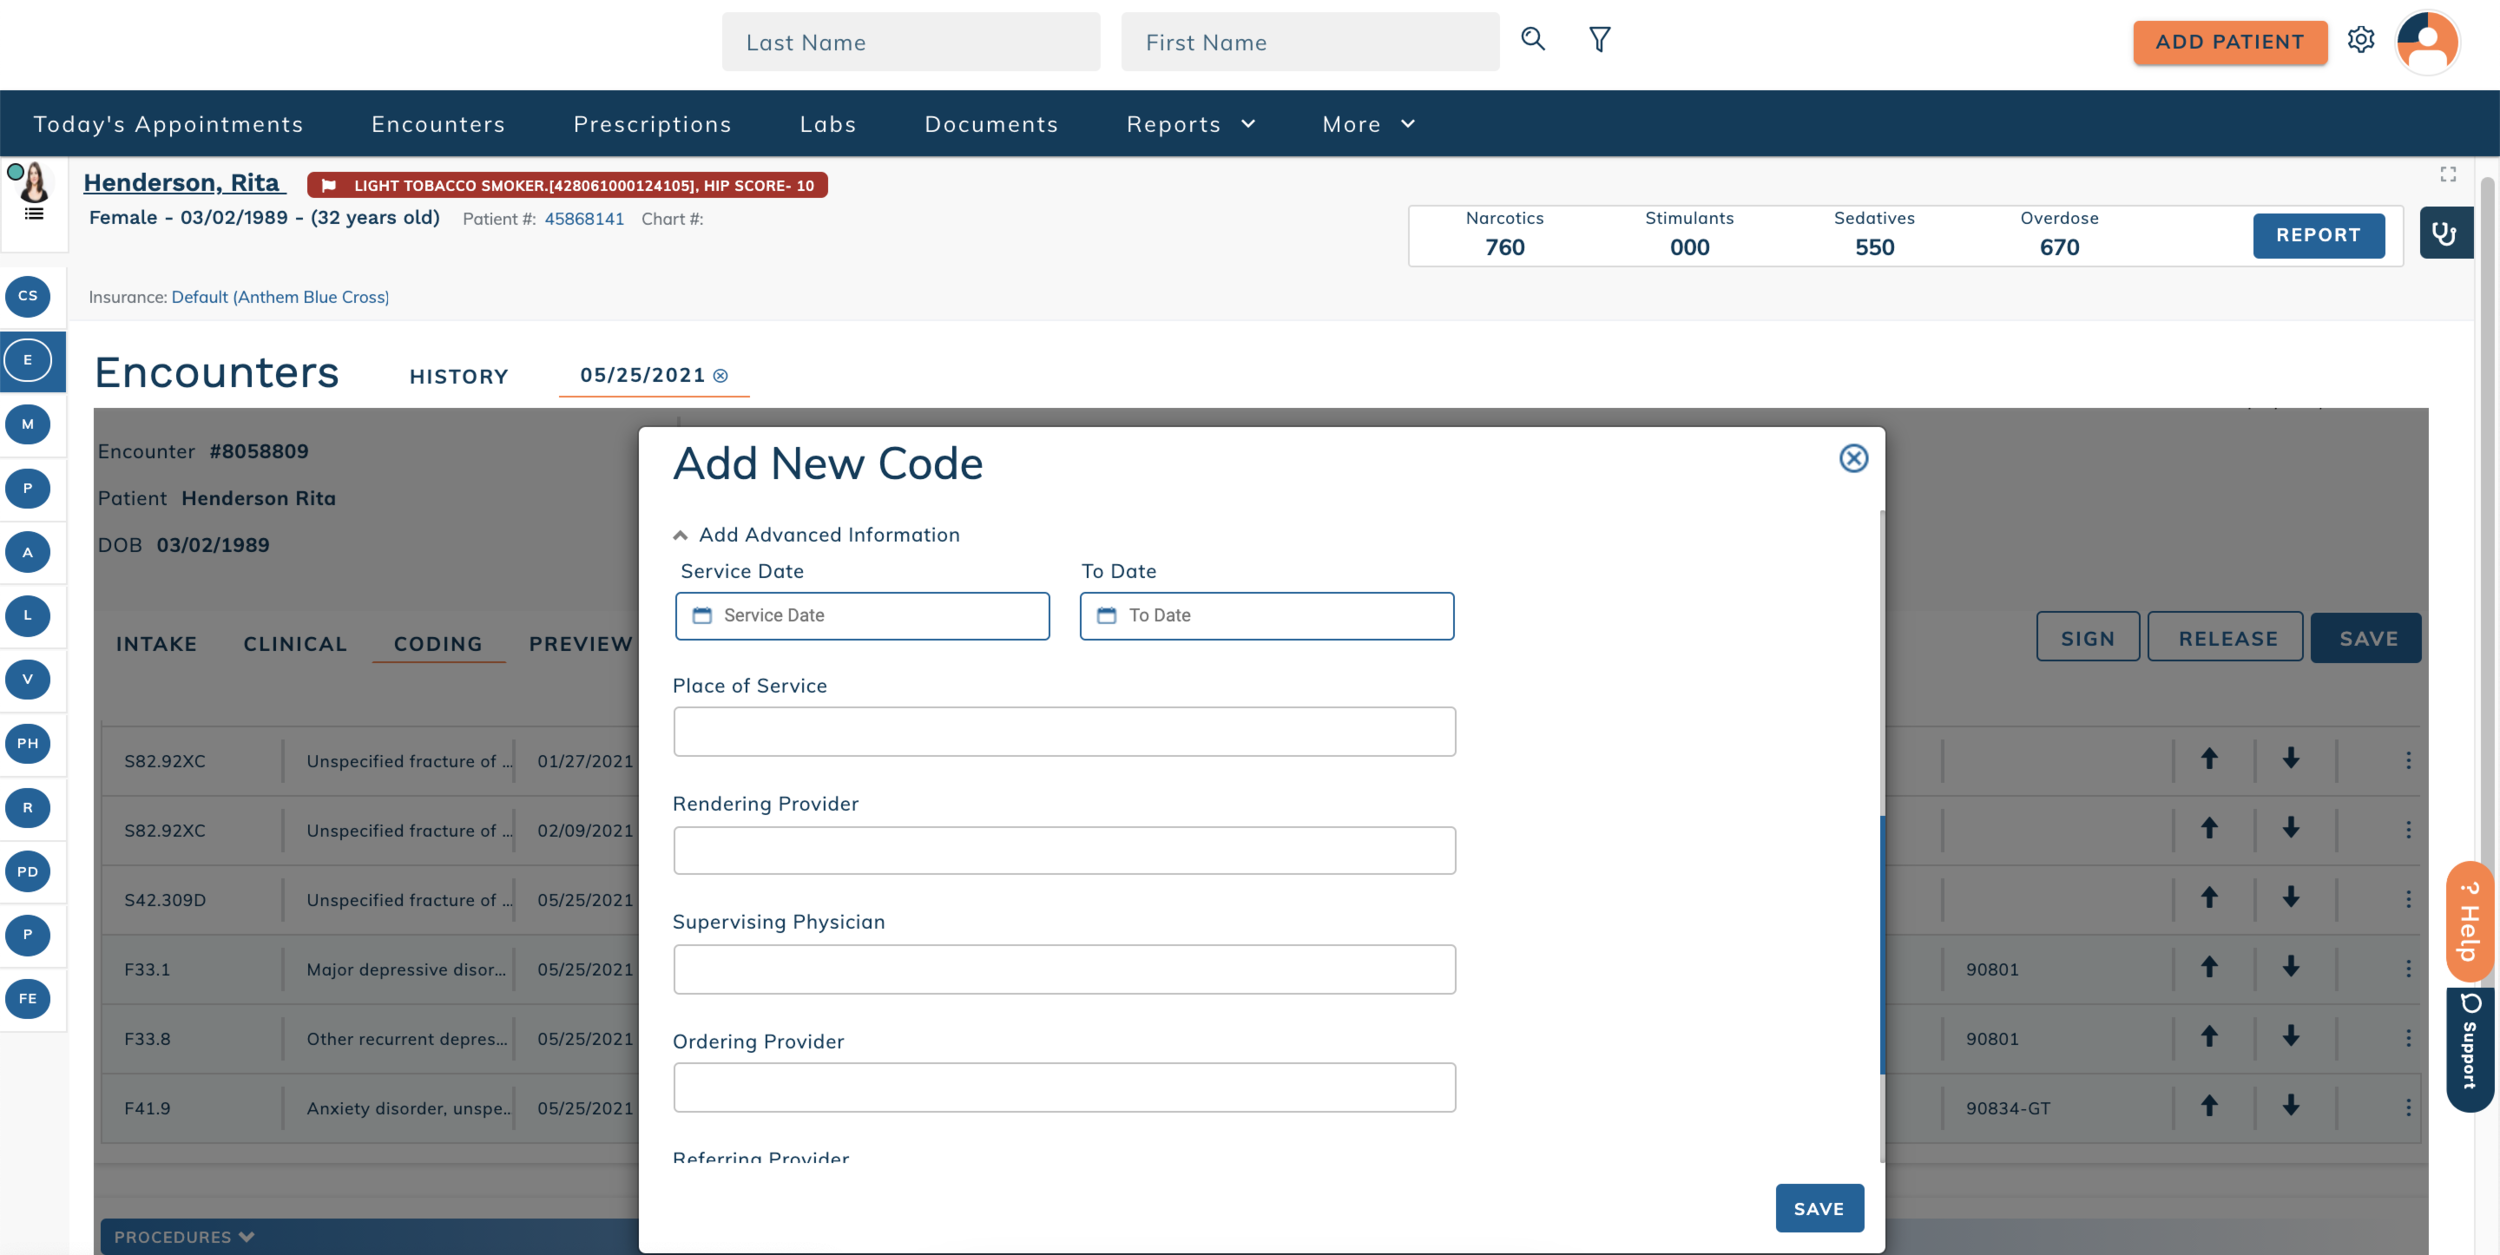
If the Advanced Information was selected, additional fields will show automatically. Place of service and provider options are based on the items set up in the practice management component.
Only the procedure code is required. Linked diagnosis codes and units are optional. Click Save to add the procedure to the Coding plugin.
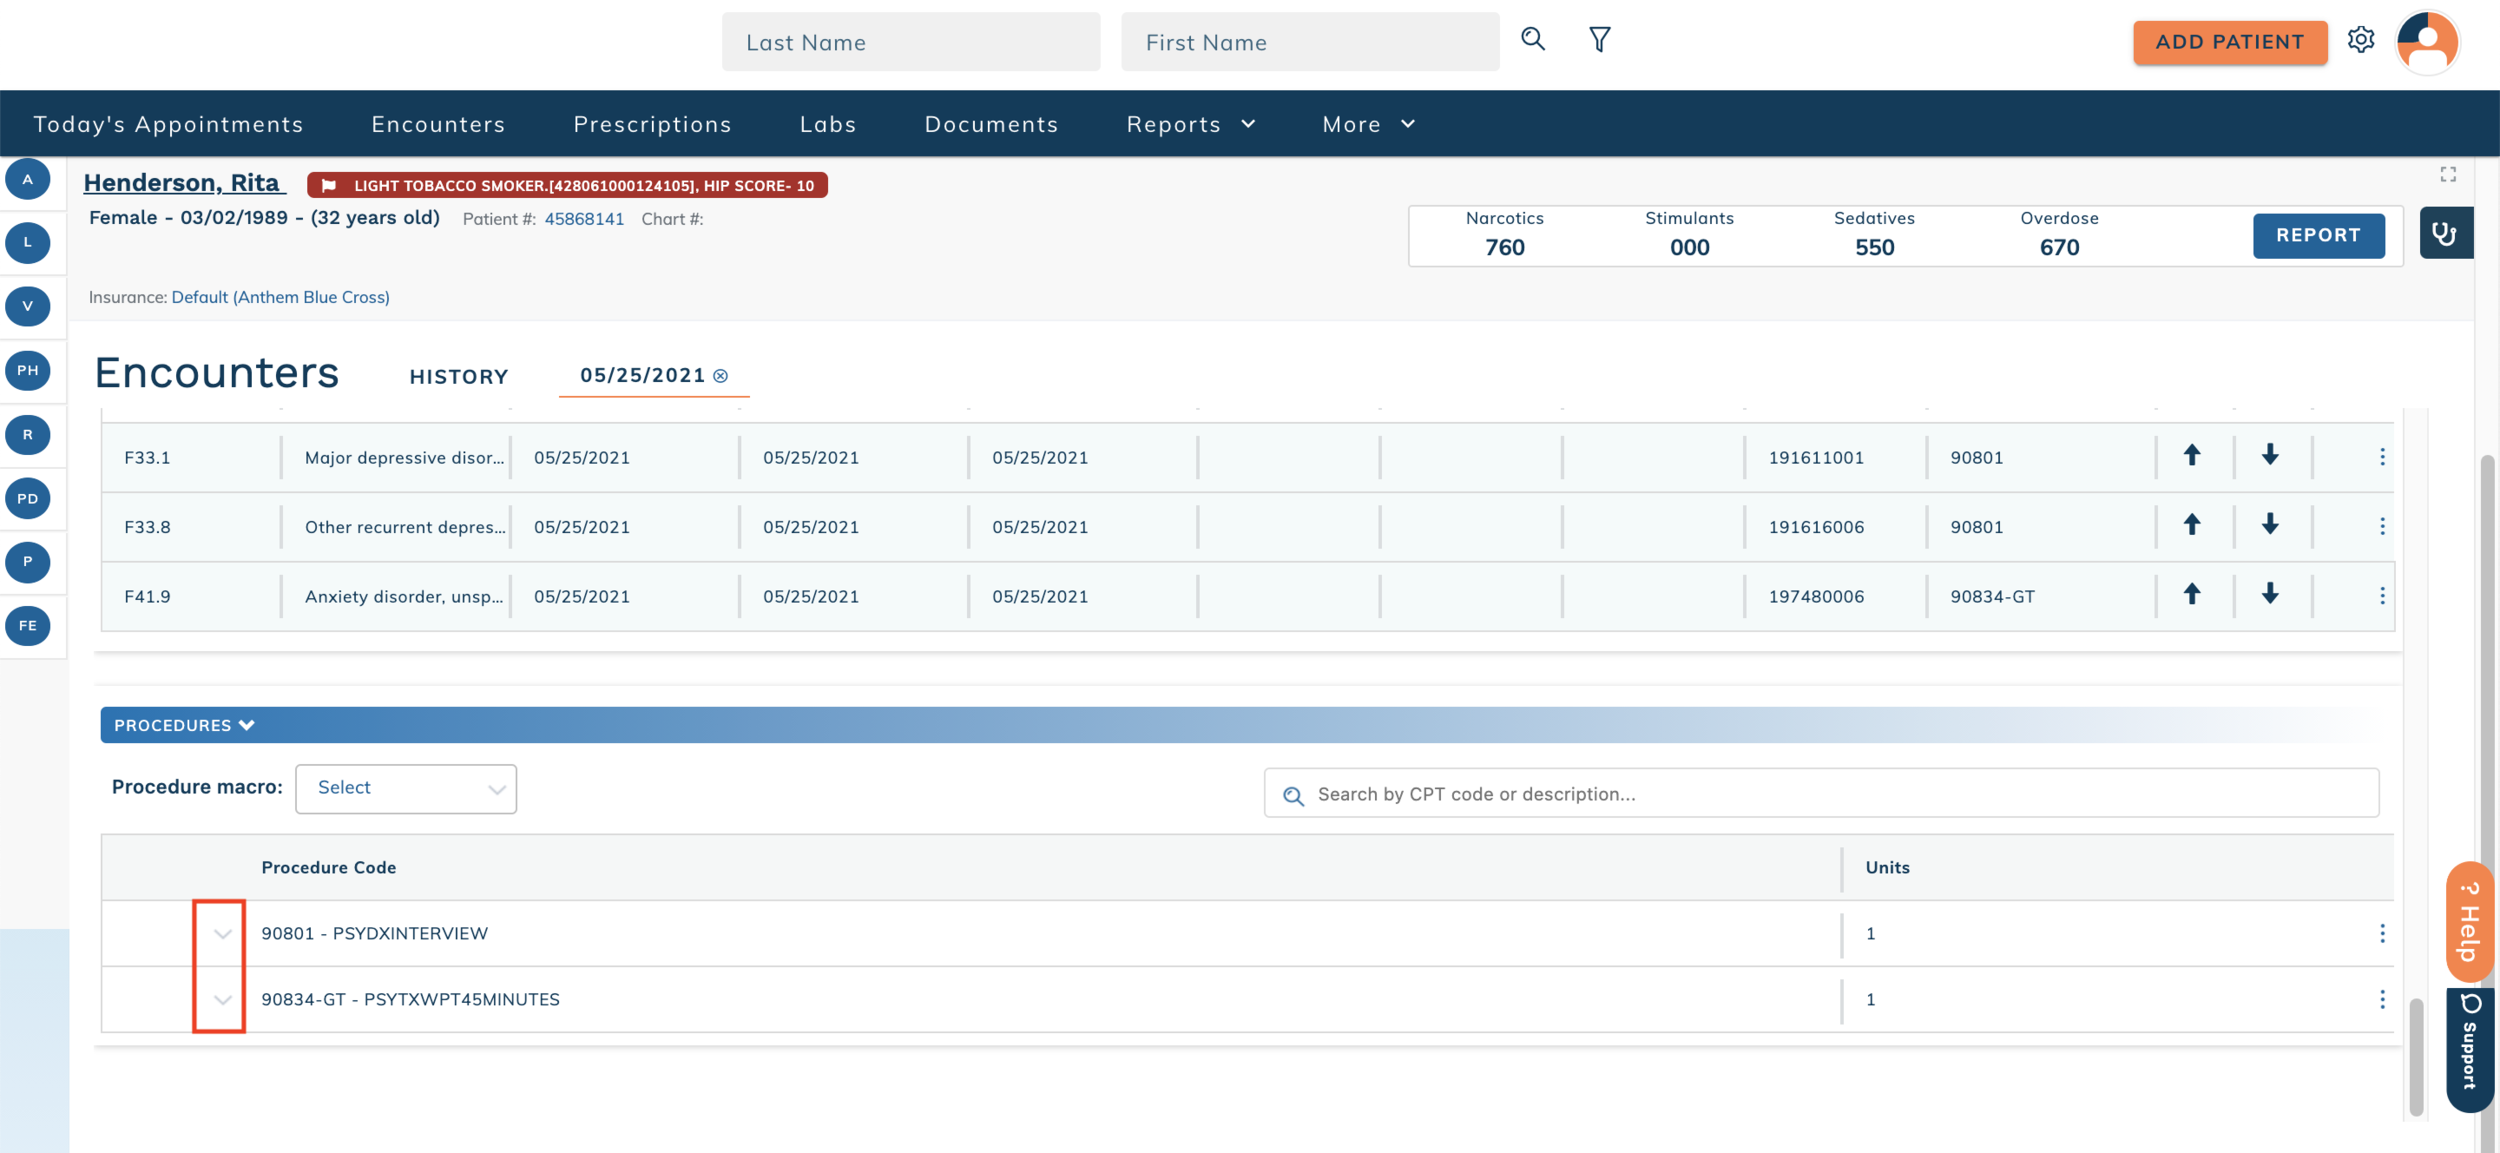
Click the v icon to view details linked to a procedure code.
To remove a procedure, click the three-dot icon to the right and select Delete.
Select Edit to make changes to linked information for a procedure.
Procedure codes, linked diagnoses, and linked modifiers will display on the encounter PDF.